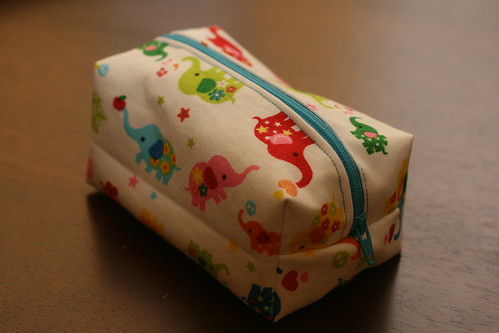
Perfect Box Pouch Tutorial
Adapted from ModernQuiltLove
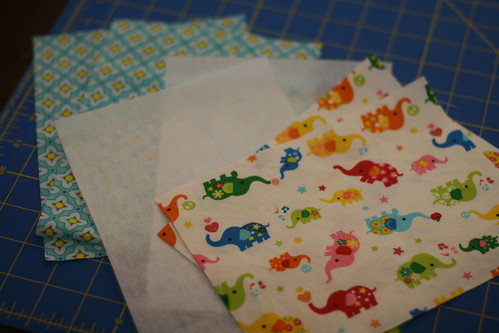
You will need:
- 2 pieces of exterior fabric measuring 8 inches by 6 inches. (The longer side will be the top of your pouch, keep this in mind when cutting directional fabric)
- 2 pieces of interior fabric measuring 8 inches by 6 inches
- 2 pieces of mid-weight woven non-fusible interfacing (This helps add body to your bag, because without it it wouldn’t be very “boxy”"
- 1 12 inch zipper
- Coordinating thread (this will be visible on the outside of the bag)
Things that will come in handy:
- rotary cutter
- cutting mat
- shears
- craft scissors
- clear ruler
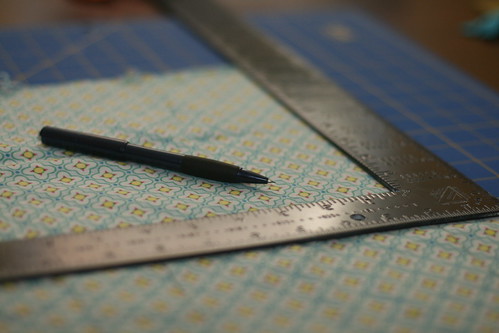
Step 1:
Choose and cut your fabric
Use a right angle ruler to make sure that the fabric pieces are nice and square.
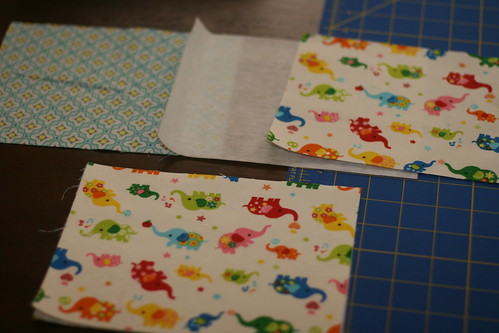
Step 2: Layer your pieces. Interior fabric right side DOWN, interfacing, and finally exterior fabric right side UP.
Step 3: Stitch the layers together 1/4 in from the edge. You can use a 1/4 in foot or the edge of your presser foot. These stitches will not be visible and are only done to hold the layers together for the next step. Fold the edges under 1/2 in and press.
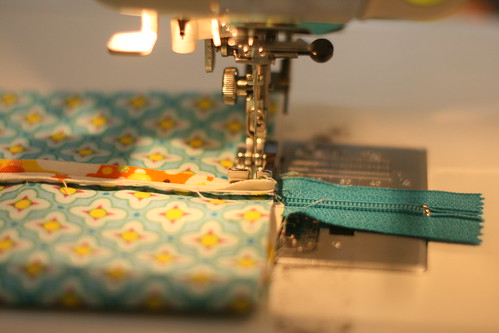
Step 4: Places both sets of fabric with the pressed under edges on top of the zipper and sew together.
Step 5: Fold the two sides right sides of the exterior fabric together. The right side of your interior fabric will then be facing up. Stitch a quarter inch seam along the raw edge. I also suggest using shears to finish your seams so they don’t fray with use (I forgot to do this…)
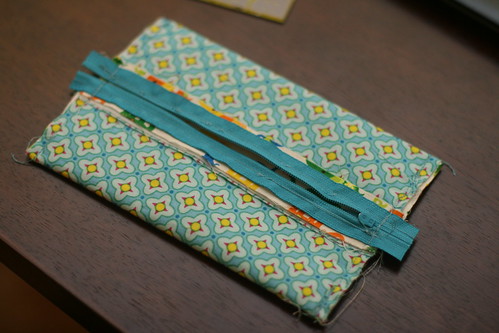
Step 6: Press the fabric tube you have created flat ensuring you have centered the bottom seam on the zipper.
Step 7: Move your zipper pull to the center and stitch a quarter inch seam on both sides. Make sure you go over the zipper 2 or 3 times to secure it.
Step 8: Cut off the excess ends of the zipper leaving about an inch from your seam.
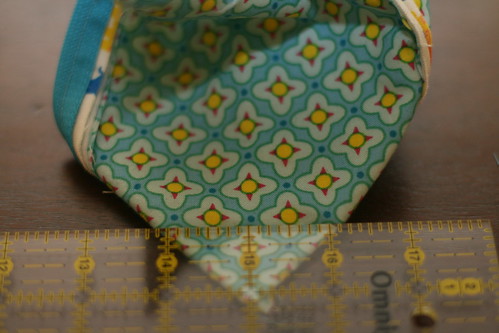
Step 9: Pinch the corners out to form triangles and draw a line one inch from the point and roughly two inches across. A clear ruler is key! Pin in place and sew across the two inch line on all four sides.
Step 10: Use your shears to cut off the excess fabric. This reduces the bulk and finishes your seam in one step.
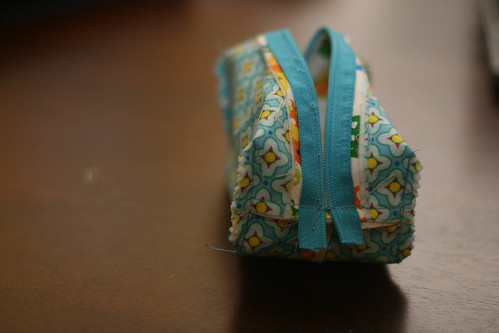
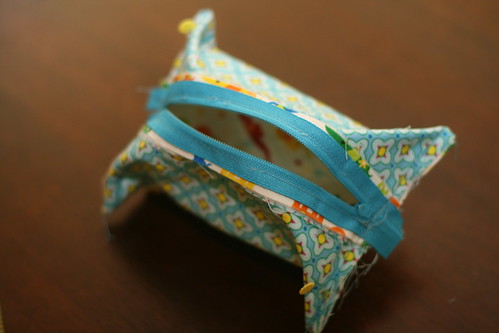
Step 11: Turn your pouch and admire your handiwork!
You can fill it with on the go sewing essentials like I did.
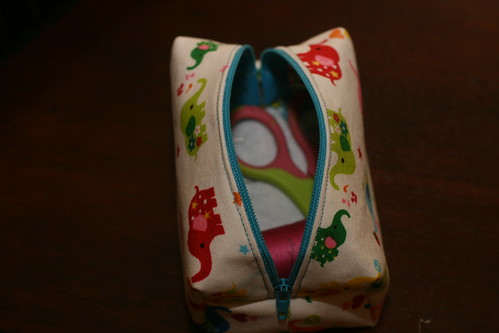
Or use it as a change purse, first aid kit, on the go toy “chest,” cosmetic case, candy bag, etc
******************************************************
Coin Pouch

» photos: J. Velasquez » model: Braelyn C.
4” (10 cm) wide x 4 ½” (11.5 cm) deep.
1 rectangle measuring 5 ¾" x 10 ¼" (14.5 x 26 cm) for the shell
Various cotton
1 rectangle measuring 5 ¾" x 2" (14.5 x 5 cm) for the front band
2 rectangles, each measuring 6 ¼" x 2" (16 x 5 cm) for the frame casing
1 rectangle measuring 5 ¾" x 10 ¼" (14.5 x 26 cm) for the lining
Fusible Fleece
1 rectangle measuring 5 ¾" x 10 ¼" (14.5 x 26 cm)
4" (10 cm) purse flex frame
1 large cover button for decoration
Materials
Linen (shown: natural)1 rectangle measuring 5 ¾" x 10 ¼" (14.5 x 26 cm) for the shell
Various cotton
1 rectangle measuring 5 ¾" x 2" (14.5 x 5 cm) for the front band
2 rectangles, each measuring 6 ¼" x 2" (16 x 5 cm) for the frame casing
1 rectangle measuring 5 ¾" x 10 ¼" (14.5 x 26 cm) for the lining
Fusible Fleece
1 rectangle measuring 5 ¾" x 10 ¼" (14.5 x 26 cm)
4" (10 cm) purse flex frame
1 large cover button for decoration
Tools
Hera markerINSTRUCTIONS
Note: All seam allowances are 1/4” (6 mm) unless otherwise indicated.
Step 1: Fuse the fleece to the linen piece per the manufacturers instructions.
Step 2: On the front band piece, fold over the long sides by ¼" (6 mm), toward the wrong side, and press; set aside.

Step 3: Place the linen shell flat in front of you so that the short edges are at the top and bottom and the long edges are to the side. With a hera marker and an acrylic ruler mark a line across the linen shell, 2 ¼" (5.5 cm) down from the top edge to indicate the placement for the front band.

Step 4: Now place the front band on top of the linen shell with the right side facing up and line up the top folded edge with the line made in Step 2. lining up all edges and pin all layers together.

Step 5: Topstitch the cotton strip to the other layers along both folded edges, 1/8” (3 mm) from the edge; set aside.

Step 6: On one of the frame casings, fold over the short sides by 1/4" (6 mm), toward the wrong side, and finger press. Then, fold them over again by ¼” (6 mm) and finger press again.

Step 7: Topstitch each fold 3/16" (5 mm) from the edge and press.

Step 8: Now fold the frame casing in half lengthwise, with wrong sides together, and press.
Step 9: Repeat Steps 6–8 with the remaining frame casing.
Step: 10 Lay the layered linen shell piece flat in front of you with the right side facing up. Place the frame casings on top of the shell with right sides together, aligning the doubled raw edges of each frame casing with one of the short raw edges of the shell and centered so that there is ¼” (6 mm) of seam allowance left free on each side of the frame casings. Pin in place.

Step 11: Stitch the frame casings to the shell, through all layers, along the matched edges. Fold the casings up off the shell and press the seam allowances toward the shell. Topstitch the bottom edge of the casings.

Step 12: Fold the shell in half widthwise, right sides together, and line up all of the edges (the frame casings will meet at the top). Pin together along the sides, leaving the top (with frame casings) open. Stitch together at the sides. Be careful not to stitch through the casings. Open the seam allowances and finger press.

Step 13: At the bottom of one side seam, flatten the side seam so that it lies directly on top of the bottom fold of the shell, this will form a triangle. Measure in from the point of the triangle about 1 ¾” (4.5 cm) and mark with a fabric marking pencil. Use an acrylic ruler and the fabric marking pencil to mark a line across from edge to edge, through the existing mark .


Step 14: Stitch along the marked line, then cut off the triangle, about ¼” (6 mm) from the stitch line.


Step 15: Repeat Steps 14 and 15 on the other side of the pouch.
Step 16: With a handsewing needle and thread, attach the buttons as desired along the front band.

Step 17: Fold the lining piece in half widthwise, right sides together, and line up all edges. Stitch together both sides, leaving the top open.
Step 18: Repeat Steps 14 and 15 at each corner of the lining, making the first mark about 1 ¼” (3.2 cm) from the point of the triangle.
Step 19: Fold the top of the lining pouch over toward the wrong side about ¼" (6 mm) and press. Turn the lining right side out.
Step 20: With the linen pouch still turned inside out, pull the lining pouch up around it (wrong sides will be together) and pin in place around the top edge. Handsew the lining to the linen pouch with a blindstitch being sure to cover the frame casing seams. Turn the pouch right side out.

Step 21: Slide the frame into the frame casings, carefully gathering up the fabric as you go so that the frame comes out the other end.

Step 22: Follow manufacturer’s instructions to close the frame and then spread the fabric evenly across it. To open the pouch simply squeeze the two ends of the frame toward each other and the pouch will spring open
**********************************************************************************
Cutie Pouches
You need:

This one's quick! Make a couple at a time and keep one for yourself this time (I did!).
{1/4" seam allowances throughout}

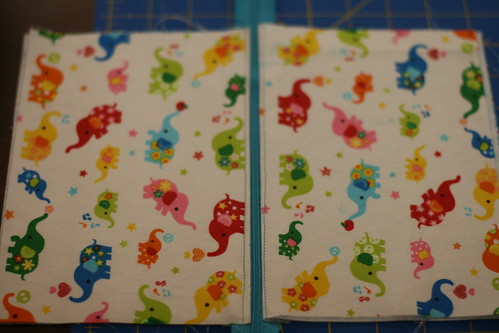
Cut your exterior & lining pieces in half (measuring 4 x 6.25 each, you'll have 4 pieces)
Take your 2 x 3 piece of fabric, fold right sides together the long way, sew. Turn right side out and press with the seam in the middle of the fabric.


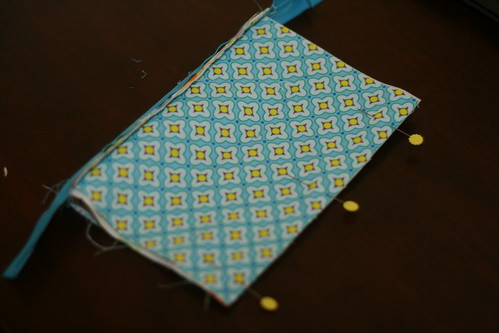
Lay down the first exterior fabric right side up, place your zipper teeth side down with the zipper pull to the left. Lay one of the lining pieces right side down. Pin if you'd like. Using your zipper foot sew together.


Flip wrong sides together. Next lay your remaining exterior fabric piece right side up, place your zipper teeth side down with the zipper pull to the right this time. Lay the remaining lining piece right side down on top of the zipper. Pin. Sew. Flip wrong sides together, press.

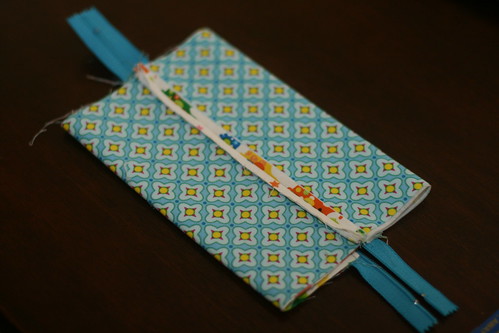
Flip right sides together (be sure to open your zipper about half way now). Tuck in your tab that you made earlier between the exterior pieces of fabric, with the tab's raw edges pointing out.


Sew around entire parimeter leaving a 2 to 3" opening in the lining for turning.

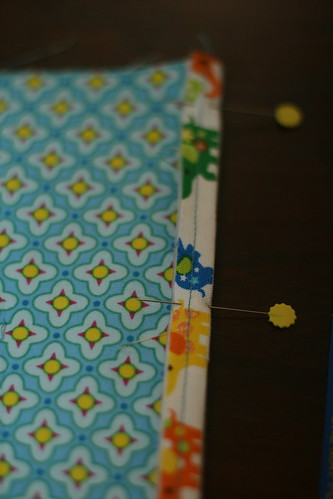
When I'm sewing around the parimeter, I make sure to push the zipper towards the exterior fabric on both sides when sewing across the zipper (zoom in on the above picture if you need to). Clip corners, exess zipper. Pull inside out through the opening. Poke your finger or chopstick to push out the corners now. Sew opening in lining shut with small seam allowance. Push lining into exterior. Press.

Attach your key ring, you're good to go! Stuff in all those gadgets and whatever else you might need, a camera, cell phone, iPod, you name it.
- 8 x 6.25 piece of exterior fabric (interfaced)
- 8 x 6.25 piece of lining
- 2 x 3 piece of fabric for key ring loop
- split key ring
- 8" zipper

{1/4" seam allowances throughout}

Cut your exterior & lining pieces in half (measuring 4 x 6.25 each, you'll have 4 pieces)
Take your 2 x 3 piece of fabric, fold right sides together the long way, sew. Turn right side out and press with the seam in the middle of the fabric.


Lay down the first exterior fabric right side up, place your zipper teeth side down with the zipper pull to the left. Lay one of the lining pieces right side down. Pin if you'd like. Using your zipper foot sew together.


Flip wrong sides together. Next lay your remaining exterior fabric piece right side up, place your zipper teeth side down with the zipper pull to the right this time. Lay the remaining lining piece right side down on top of the zipper. Pin. Sew. Flip wrong sides together, press.

Flip right sides together (be sure to open your zipper about half way now). Tuck in your tab that you made earlier between the exterior pieces of fabric, with the tab's raw edges pointing out.


Sew around entire parimeter leaving a 2 to 3" opening in the lining for turning.

When I'm sewing around the parimeter, I make sure to push the zipper towards the exterior fabric on both sides when sewing across the zipper (zoom in on the above picture if you need to). Clip corners, exess zipper. Pull inside out through the opening. Poke your finger or chopstick to push out the corners now. Sew opening in lining shut with small seam allowance. Push lining into exterior. Press.

Attach your key ring, you're good to go! Stuff in all those gadgets and whatever else you might need, a camera, cell phone, iPod, you name it.
*********************************************************************************
Zippy Wallet Tutorial
Here's what you need:
1 piece of exterior fabric 5" x 9.5" (interfaced)
1 piece of lining fabric 5"x 11.5" (this is also the binding & lining for the exterior pocket)
2 pieces of fabric (same as lining) 3" x 1.75" for tab (interfaced)
Must have:
sewing machine
coordinating thread
7" zipper (you could use a 6" zipper or larger, but this is what I had)
interfacing
snap, button, velcro (we'll discuss this later)
It would be nice to have:
clear ruler
self healing mat
rotary cutter
Let's go!
![]()
![]()
![]()
![]()
![]()
![]()
![]()
![]()
![]()
![]()
Now onto the fun part! Ready?
![]()
![]()
![]()
![]()
![]()
![]()
![]()
![]()
![]()
![]()
1 piece of exterior fabric 5" x 9.5" (interfaced)
1 piece of lining fabric 5"x 11.5" (this is also the binding & lining for the exterior pocket)
2 pieces of fabric (same as lining) 3" x 1.75" for tab (interfaced)
Must have:
sewing machine
coordinating thread
7" zipper (you could use a 6" zipper or larger, but this is what I had)
interfacing
snap, button, velcro (we'll discuss this later)
It would be nice to have:
clear ruler
self healing mat
rotary cutter
Let's go!


Cut your exterior fabric into 3 pieces: 5" x 3.5", 5" x 3.5", 5" x 2.5" (for the exterior pocket)
Cut your lining fabric into 4 pieces: 5" x 3.5", 5" x 3.5", 5" x 2.5" (lines the exterior pocket), 5" x 2" (make into binding for exterior pocket)

Place the pieces for the tab right sides together, draw a semicircle where the curved bottom will be (you could also make this square or pointed, whatever floats your boat!). Sew along that line. Clip curves, turn right side out. This can be a little tricky since it's pretty small. I just shove it all into itself and poke a pencil to push it through. Press and set aside.

Take your binding piece, fold in half, press, open up and press raw edges toward crease. Press.

Place your exterior pocket pieces, one of exterior fabric and one lining fabric (5" x 2.5") WRONG sides together. Take your binding and sew it into place along one of the long edges. It's pretty easy, I'm assuming everyone can get this part, just let me know if you have any questions.


Take one of the exterior pieces, place the exterior pocket along the bottom edge and baste.

Now onto the fun part! Ready?
Take the exterior with the pocket basted to it and line it up with the top edge of the zipper (zipper teeth side down and the pull tab on the left). You also add the tab here, sandwiched between the exterior piece and the zipper (just make sure about a 1/4" sticks above the zipper).

Then take your lining piece and place it RIGHT side down also lining it up with the zipper. Pin & sew with zipper foot. Make sure you try to hold that tab in place. You could baste it beforehand, but I didn't. Flip so fabrics are WRONG sides together.

Now take your remaining exterior piece and place it Right side facing you, lay the zippered layers you just sewed together aligning the top edge again zipper teeth facing down, but now the pull tab on the right hand side.

Place remaining lining piece RIGHT side down once again aligning it at the top of the zipper. Pin & sew with zipper foot.

Flip so both sides of the zipper have the fabrics WRONG sides together and press!


Next, take the exterior fabrics and place them RIGHT sides together and the lining fabrics and place those RIGHT sides together. Be sure to slide open your zipper now or you'll be doing some seam ripping later! Sew with a 1/4" seam allowance all around the edge leaving a 2" opening in the lining for turning. Clip corners. Turn right side out through the opening.

Stitch the opening closed with a very small seem allowance. Push the lining into the exterior. Press again! You're almost done!

Lastly, add your snap, button or velcro to the tab and exterior pocket and presto! you have a new zippy wallet. Perfect for stashing the essentials, and you're pretty stylish too.


Give yourself a pat on the back, you did it!